Passion Project
Introduction
First off, although most of you will already know since we were all at the fair, John and I had not finished the project despite pulling an all-nighter the day before (I still feel tired from then). To be honest, and if John tells you otherwise, he is lying to you; we were both stressed out of our minds on that day.
When everyone was deciding what to do for their passion project, I already had something in mind – in fact I had already been working on it at home in my free time; using the coding language Python and a Python module called Ursina (Basically a simplified version of unity for python) I would build a 3D simulator of a computer – much simplified of course.
But John, with his surprisingly good convincing skills comes along and asks if I want to do the Passion Project with him. I say no, but it literally took a day and a half and I was already on the verge of joining him. He soon said he would pay for the entire thing, and although I didn’t say it aloud (I acted all skeptical and not fully persuaded); I was completely sold.
The process:
I don’t know when the idea first came to us, but by the time of the second check in,
We had both decided to build an automatic chessboard. Luckily, the internet saved us, and we found an extremely well documented Instructables guiding us through most of the steps to build the project – although we had to improvise on many parts. The first thing we did was order all the parts, aside from the ones that we could create using the 3D printers. This was where we made a significant change from the example online; they had ordered their V-Rails, meaning that it could come it any length they desired. The problem was, the rails were extremely expensive, and we couldn’t justify buying them when we could probably achieve the same effect by printing smaller versions of the rails and combining them together with hot glue.
Believe it or not, but for the next one or two weeks, we made significant progress. We spent every day printing the parts, and designing other components that helped complete our project. The problem began after we finished the 3D printing stage. Before John had ordered all the materials online, we had went through each of them, and checked if we had said materials at home. When we arrived at the part with the screws, I made the assumption that my dad would have all them; he worked in that field, and from what I’ve seen, he seems to have an infinite supply of them.
…He didn’t.
We fell into this endless loop of yeah let’s go to Home Depot later to check for screws; oh there’s none there let’s procrastinate for a couple of weeks and check again; and eventually ended up ordering them online less than 10 days before presentation night. We weren’t slacking off completely; while we had been searching for the screws, I had made a pretty elaborate schedule for both of us to follow; I learned our previous schedules and found every minute of spare time that we had and wrote it down and what we should do then. The plan worked on the weekdays, but the weekends were the problem. On the Sunday 3 days before the STEAM Fair, which happened on Wednesday – the screws finally arrived, allowing us to begin assembling everything.
Although we had procrastinated until then, we managed to assemble the core XY table; explained later on – and the box in a single day (including the top face, which we made out of acrylic glass so that we could see what was going on). That happened on Monday. On Tuesday, we spent the entire day stripping and soldering the reed switches – magnet sensors for detecting where the chess pieces are. With some extra help, we finished the soldering, but because I had Mess Dinner (Air Cadets end of year celebration), I had to leave at around 4 pm; even though we hadn’t even started testing the code.
This was when the all nighter idea began; even though it was already 10 when the dinner had concluded, John came over and we started to (hopefully) finish the project. We ran into so many problems that I can’t even list them all.
Still, here are some of them:
The Event:
I was half asleep by the time I arrived at school, and because I had been the one bringing the chessboard over, I got even more scared, worried it might not be enough. Luckily, I managed to create an extremely rushed presentation (Which I ended up not using at all) on PowerPoint.
Near the first few blocks, I was confused out of my mind. Our entire gameplan was to have it working by the fair, and let it do it’s own talking; if they had any questions while playing the bot, then they could ask us from time to time. Instead, we had to do all the heavy lifting and explaining; it was pretty bad. When the Minnekhada kids came, I saw one of my younger brother’s friends in the crowd. He also recognized me, and came over asking about the project. Because I already knew him, the presentation went smoothly, and we ended up playing a game of chess and wasting a whole bunch of time; it was still an invaluable experience to me; I knew what type of presentation I was going to go for during the parents and guests session after school.
The (real) Presentation:
One thing I was scared about was people not coming to watch at all because it was incomplete; that wasn’t a problem. Adults came first, asking what it was, but where our presentation truly did well was when we presented to the kids. I tried to make my explanation as interactive as I could, offering them the pieces and letting them test the electromagnet, reed switches, etc. And although it was an incomplete project, I still felt really proud in that moment. I would’ve tried to finish it with time left over if I knew what was going to happen, but I wouldn’t change much; the procrastination and the impromptu presentation, as I had save proved to be so important to me.
Overall, I think our project went well, but in a direction we didn’t expect. Anyhow, here are some photos of our progress with some explaining.
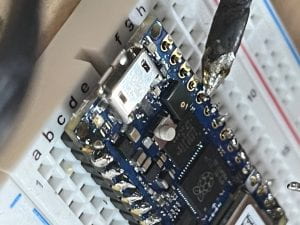
 Me attempting to solder the Arduino Nano; needless to say I failed – John only let me try because he wanted a photo
 When we started to realize we may not be able to complete the project, we started taking a lot of random photos of it; this was one of many.
 The multiplexers we used to know which reed switches are on or off – never got to truly test them.
 This was the Monday of the presentation week – the day we assembled two months worth of work in a single sitting.
 Photo of our completed(?) board during the STEAM Fair.
 Accidental upload; but on the note of this – Josh stayed asleep in this position for over an hour.
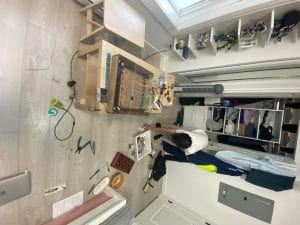 Was meant to be a snap (snapchat) of me, but accidentally took one of my dirty room while we were working on the project.
 First two rails that we printed.
 Believe it or not, we actually came in on a Pro D day and printed some rails and other parts, and filmed a time lapse of it printing.
 All the rails
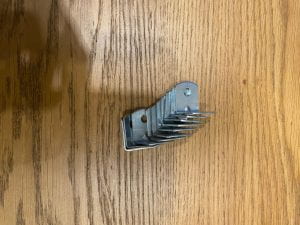 Corner brackets for the V-rail connections
 Photo of all our different parts
 Basic motor system that we were testing
 Applying the acrylic glass board onto the cardboard box for the first time with liquid glue; it didn’t end up well so we just hung it on there as opposed to gluing it down.
 Failed V-rails (part 1)
 Failed V-rails (part 2)
 Testing out random stuff, hoping it works, no pressure at all, etc.