
 How to mail merge to send bulk emails.
- You will need three documents to mail merge.
- Mailing document (Email message that will be identical for each email)
- Mailing list
- Merged document (Combination of the main document and the mailing list)
- Prepare the main document. Write the email message you want to send to in Word.
- Click “Mailings“, go to “Start Mail Merge” and click “E-mail messages“.
- Set up your mailing list in Word.
- Link your mailing list to your email message on your main document file. On your main document, click “Mailings” and choose “Select Recipients“. You can now open the mailing list you made or if you have not made one, you can create one by clicking “Type a New List” Open the mailing list.
- Edit your mailing list. Choose “Edit Recipient List“. You can uncheck the box next to the name if you do not want to include them.
- Insert a merge field. Click “Address Block” or “Greeting Line” and you can choose a format for the student’s name. Click “OK” and “Save“.
- Preview and finish the mail merge. Click “Mailings” and then choose “Preview Results“. You can check your data source and view how the records will appear by clicking “Next” or “Previous” buttons.
- Save your mail merge.
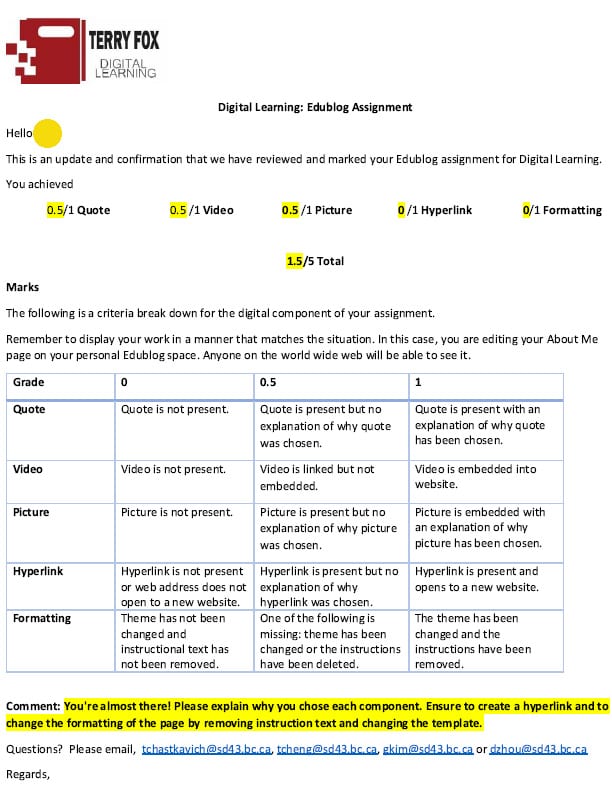
To the left is an example. Highlighted areas are personalized.
How to mail merge using an Excel spreadsheet.
- You will need three documents to mail merge.
- Mailing document (Email message that will be identical for each email)
- Data source (Excel spreadsheet)
- Merged document (Combination of the main document and data source)
- Prepare the main document. Write the email message you want to send to in Word.
- Click “Mailings“, go to “Start Mail Merge” and click “E-mail messages“.
- Prepare data in Excel.
- In Word, click “Mailings” and choose “Use an Existing List” under “Select Recipients“. You can now open the Excel spreadsheet you made.
- Browse to your Excel spreadsheet, and then click “Open“. Choose sheet1$ and “OK“. Now the Excel spreadsheet is connected to the mail merge document.
- Edit your mailing list. Choose “Edit Recipient List“. You can uncheck the box next to the name if you do not want to include them.
- Insert a merge field. Click “Address Block” or “Greeting Line” and you can choose a format for student’s name. Insert the data from your spreadsheet. Click “Insert Merge Field” and choose a filed name/column name and then click.
- Preview and finish the mail merge. Click “Mailings” and then choose “Preview Results“. You can check your data source and view how the records will appear by clicking “Next” or “Previous” buttons. Click “Finish and Merge” and click “Send E-mail Messages“.
- Save your mail merge.
For more detailed instructions with screenshots, click HERE.