Drafting Projects:
Digital Portfolio:
This digital portfolio includes all the projects that I have done in STEAM grade 10 thus far. This portfolio includes CLE, and Drafting.
Isometric Drawing:
The Isometric drawing was the first STEAM assignment of this school year that included drafting. I drew the STEAM logo for this assignment. However, unfortunately, the drawing was misplaced by myself. So once it is found it will be posted below.
Auto CAD Maze:
The Spamton maze was designed using AutoCAD and was a very fun project. However, the maze was misplaced by myself as well so an image of it will be posted below once it is recovered. The reason why it was named the Spamton maze is because it was modelled after the famous videogame character Spamton G. Spamton.
The maze included many wild twists and turns and I made sure to frustrate the player by creating multiple paths that look like they are leading to the exit but end up getting cut off just before the exit.
1 to 4-point Drawings:
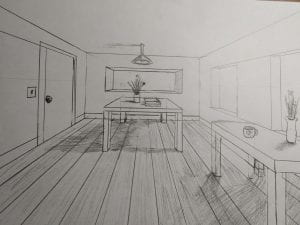
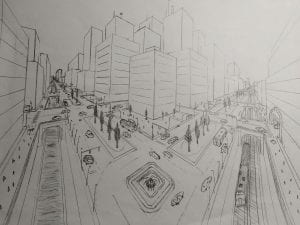
The images below are my 1-point and 2-point perspective drawings. These drawings were done with pencil and ruler and based off the tutorials that were shown to the class for each of the drawings.
The 1-point perspective drawing features a room with light shining in from the windows.
The 2-point perspective drawing features a massive city with people and cars placed at specific areas to mimic real life.
The 3-point perspective drawing features a tower and a very dirty sidewalk with a large rat also in the picture.
The 4-point perspective drawing also features a city but in a much different point of view. The 4-point looks like as if you cut a chunk of city out and looked at it with a fish-eye lens.
1-Point Perspective Drawing:
2-Point Perspective Drawing:
3-Point Perspective Drawing:
(Image coming soon, image was misplaced)
4-Point Perspective Drawing:
(Image coming soon, image was misplaced)
Gravity Car Project:
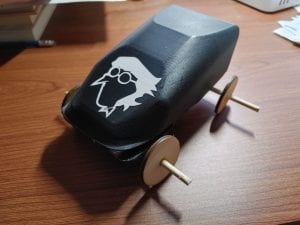
The gravity car we made included a 3D printed body which made the car very heavy, along with laser-cut wheels and a sticker design meant to resemble the popular video character Spamton G. Spamton.
I contributed to my group by designing the body of the car. If you look at the image again you will see this massive crack at the front of the car. This crack came to be when the original print was overtaken by the weight of the upper body and ended up collapsing in on itself. So, what I had to do to “fix” the car was I printed the missing piece of the car and bonded the two pieces together using hot glue.
The challenge goal of the gravity car challenge is to create a car with the maximum efficiency. My group’s car got 22.97% efficiency due to its mass, energy, and speed.
Gravity Car, Spamton mobile/ mobile brick:
This link below is the video of our gravity car (Spamton mobile) in action:
Lit. Launchers Project:
The images, show the launcher I am currently designing for the Lit. launchers challenge.
These plastic structures were all designed in Autodesk inventor and printed with a 3D printer.
Image A:
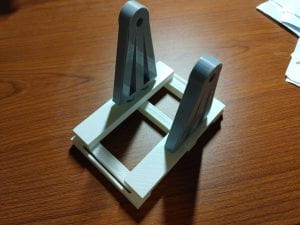
Image B:

My Lit. Launchers project is still under its design phase. However, I already have everything planned out.
So, if you look at the first image, I plan on laser-cutting two pieces of wood to insert into the thin slots on the base of the structure which will then have multiple rubber bands attached to it and the pegs on the arm, which should in theory, generate lots of elastic potential energy.
Then for the projectile, I will try designing 1 to 5 15mm plastic projectiles using Autodesk Inventor once again.
Update:
After the team was finished designing all of their launchers, we all began to test them to make sure that they work properly for the challenge. The challenge made it so that the launchers with the most desired parameters gain points such as range and accuracy and those with the least desirable parameters lose points such as weight and volume of the launcher.
After the challenge my team’s average score came out as 1093, my personal final score was 1724. Compared to other teams, our average team score came out higher than all other teams.
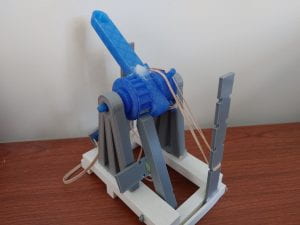
This image is the final product. The blue piece is the arm and the grey bar sticking into the arm is the tensioner which allows the arm to crank all the way back and then shoot a projectile at high speeds when released. This launcher is capable of shooting 870 cm or 8.7m at a very high speed that made the projectile not visible during the filming.
Unfortunately I was not able to insert the filming of our challenge into this website due to file size constraints.
Cardboard Boat Building Contest:
The boat racing challenge was much more challenging than my group and I had initially anticipated. However, we managed to pull through with the boat sinking nearly 10 seconds after being in the water.
My group and I designed a boat with a very complex design. We made the boat big enough to fit 1 person but small enough for the 1 person to be able to row. However, after testing it, we ran into lots of trouble with the center of the boat collapsing in onto itself after I climbed into it. Also, the sides of the boat were too low and allowed water to easily seep in from the sides. Thus, we lost the race but learned a valuable lesson in cardboard boat building.
RIP Boat 😢:
The image shown here is the final image of the boat right before it was destroyed in a devastating water leakage.
Shown in the image is the bow of the boat with massive amounts of duct-tape and masking tape.
Unfortunately this is the only remaining image of the boat.
CLE Career Project:
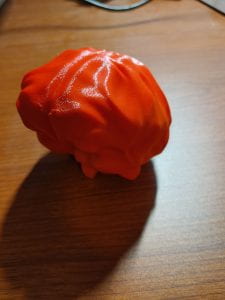
For the CLE career project, I made as seen below, a brain and a strand of code. The reason why I made these things was because the career I chose was a Neurologist.
To design the brain, I learned a software called Blender because unlike Autodesk Inventor, Blender was much better at creating organic looking structures.
As for the code, I wrote a piece of code in Arduino that allows a bundle of lights to light up when it detects a temperature over 27ºC to mimic how neurons transmit the feeling of touch to your brain and to show how important each neuron is because if even 1 light were to break then the rest of the lights will no longer transmit the signal to your brain.
My plan for my CLE project is to write a complex piece of code which will allow the lights to perform a “light show”. Basically, what I am attempting is to make the sound sensor react to specific words to make the lights create a light show. For example, if someone were to say square then the lights will display a square and so on.
Image of Brain that was printed:
Video of the lights reacting to heat and sound:
To the right is a video of the Updated CLE project lights. Here you can see that when the heat sensor reacts with heat, the signal is blue, and when the sound sensor reacts with noise it transmits a green light.
This is far from the finishing product though.
Ping Pong Pick up Challenge:
The ping pong pick up challenge was a challenge where the main goal is to pick up a ping pong ball from a long distance using a grabber. The way to gain and lose points is simple, the more materials used in the grabber, the more points will be deducted from you, and the longer distance it can reach, the more points you will gain. In short the goal is to create a grabber using the least amount of materials possible that can reach as far as possible.
The rules were that the hand holding onto the grabber must stay behind a line of tape and only the grabber could cross it. You need to pick up the ball with the grabber and then carry the ball back without dropping it on the ground, otherwise you would need to start over.
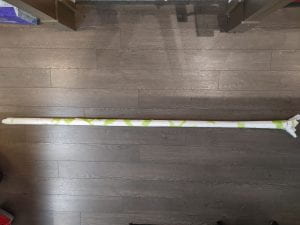
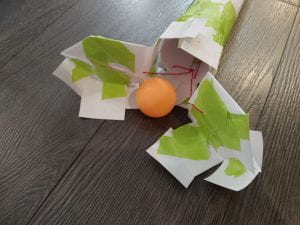
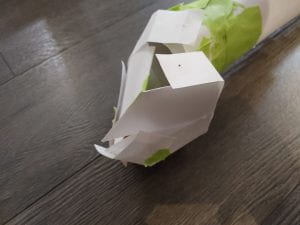
The images below are of my own personal grabber. The materials used in this grabber were 20 sheets of blank paper, 1 paper clip, 150cm of red string and a quarter roll of green masking tape. The entire grabber spanned 225cm but its reach was only 209cm.
In the end, my team, Team Llama, scored 104 points. This score when compared to other scores in my class, was not the highest, nor was it the lowest. The reason why my points were this low was because of the sheer amount of paper that I used to construct the grabber which was 20 sheets. This deducted 100 points.
The way this arm was constructed was that many sheets of paper were taped together diagonally and then rolled into a cylindrical shape. The diagonal taping was to increase structural integrity. Then on one side there would be a hand and on the other a string would hang out. If you look at image 2 you would see a paper clip inside the cylinder; when the string is pulled from the other side, the hand closes on the ball and then it can be brought back without falling.
Unfortunately I do not have a recording of this contraption picking up a ping pong ball.